이전의 TensorRT plugin 사용하는 방법을 설명드렸는데요. TRT모델로 inference하는 코드에 대한 설명이 부족하고 저도 잘 이해하지 못한 부분이 있어 이번 글에서 설명드립니다.
0. Inference용 모델 및 개발 환경
Inference를 위해 사용한 모델은 YOLOv7 모델입니다. 모델은 yolov7.trt 다운가능하며 input의 shape은 (1,3,640,640)로 설정하였으며 output은 총 4개로 나뉘면 각각 num_detections(detection된 object개수), nmsed_boxes(object의 bounding box 좌표), nmsed_scores(object의 confidence score), nmsed_classes(object의 class)입니다. output shape은 아래와 같습니다.

개발 환경은 다음과 같습니다. (Docker container에서 구축했습니다.)
- onnx: 1.8.0
- torch: 1.9.0a0+df837d0
- onnx-graphsurgeon: 0.2.8
- tensorrt: 7.2.2.3
- CUDA: 11.2
- Driver Version: 460.73.01
- GPU: Tesla V100
Input image는 아래 사진을 사용하였습니다.

1. TensorRT Inference
python 환경에서 TRT 모델을 inference하겠습니다. 코드 한줄씩 설명드리며 어떻게 TRT 모델이 작동하는 지 봐보죠!
아래에 사용된 코드와 전체 코드는 여기서 확인가능합니다.
1.1 Load TensorRT model
    def load_model(self):
        TRT_LOGGER = trt.Logger(trt.Logger.WARNING)
        runtime = trt.Runtime(TRT_LOGGER) # serialized ICudEngine을 deserialized하기 위한 클래스 객체
        trt.init_libnvinfer_plugins(None, "") # plugin 사용을 위함
        with open(self.model_path, 'rb') as f:
            self.engine = runtime.deserialize_cuda_engine(f.read()) # trt 모델을 읽어 serialized ICudEngine을 deserialized함

        self.context = self.engine.create_execution_context() # ICudEngine을 이용해 inference를 실행하기 위한 context class생성
        assert self.engine
assert self.contexttrt.Runtime: Serialized된ICudaEngine을 deserialized하기 위한 클래스 객체- 기본적으로 .trt 파일은 serialized 즉, bytestream으로 저장되어 있음
runtime.deserialize_cuda_engine: .trt 모델을 읽어 serializedICudEngine을 deserialized함- bytestream인
ICudaEngine을 deserailized하게 되면 아래와 같이self.engine에ICudaEngine클래스 객체가 생성됨 ICudaEngine는 아래의 사진과 같이 모델의 다양한 정보를 가짐device_memory_size: trt 모델을 실행시키는 데 필요한 총 memory 양max_batch_size: 최대 batch 수num_bindings: I/O binding의 수 (Input 수 1개 + Output수 4개=5)num_layers: trt 모델의 layer개수
- bytestream인

self.engine.create_execution_context:ICudEngine을 이용해 inference를 실행하기 위한IExecutionContextclass생성- 해당 class의 함수로 이후에 Inference 실행

1.2 Setup I/O binding
I/O binding이란 trt모델의 Input과 Output의 정보를 저장하고 이는 이후에 GPU연산을 위해 또한 Inference에 사용됩니다.
    def alloc_buf(self):
        self.inputs = []
        self.outputs = []
        self.allocations = []

        for i in range(self.engine.num_bindings): # input과 output의 개수만큼
            is_input = False
            if self.engine.binding_is_input(i): # i번째 binding이 input인지 확인
                is_input = True
            name = self.engine.get_binding_name(i) # i번째 binding의 이름
            dtype = np.dtype(trt.nptype(self.engine.get_binding_dtype(i))) # i번째 binding의 data type
            shape = self.context.get_binding_shape(i) # i번째 binding의 shape

            if is_input and shape[0] < 0:
                assert self.engine.num_optimization_profiles > 0
                profile_shape = self.engine.get_profile_shape(0, name)
                assert len(profile_shape) == 3  # min,opt,max
                # Set the *max* profile as binding shape
                self.context.set_binding_shape(i, profile_shape[2])
                shape = self.context.get_binding_shape(i)
            if is_input:
                self.batch_size = shape[0]
            size = dtype.itemsize # data type의 byte수
            for s in shape:
                size *= s # data type의 byte수 * 각 shape(e.g input의 경우 [1,3,640,640]) element 을 곱하여 size에 할당

            allocation = cuda.mem_alloc(size) # 해당 size만큼의 GPU memory allocation함
            host_allocation = None if is_input else np.zeros(shape, dtype)
            binding = {
                "index": i,
                "name": name,
                "dtype": dtype,
                "shape": list(shape),
                "allocation": allocation,
                "host_allocation": host_allocation,
            }
            self.allocations.append(allocation)
            if self.engine.binding_is_input(i): # binding이 input이면
                self.inputs.append(binding)
            else: # 아니면 binding은 모두 output임
self.outputs.append(binding)self.engine.binding_is_input(i): i번째 index를 가진 binding이 input을 의미하는 지 확인self.engine.get_binding_name(i): i번째 index binding의 nameself.engine.get_binding_dtype(i): i번째 index binding의 data typetrt.nptype: 해당 함수를 통해 trt의 data type을 numpy type으로 바꿔줌
self.context.get_binding_shape(i): i번째 index binding의 shapesize = dtype.itemsize, size *= s: i번째 index를 가진 binding의 data shape과 data type에 따른 data size할당- Input shape이 (1, 3, 640, 640)인경우 (data type의 byte수(4byte) x 1 x 3 x 640 x 640)를 size에 할당
cuda.mem_alloc(size): GPU memory에 해당 size만큼 allocation(할당)함host_allocation = None if is_input else np.zeros(shape, dtype): GPU로 inference후의 cpu host로 output의 정보를 받기위한 allocation된 배열
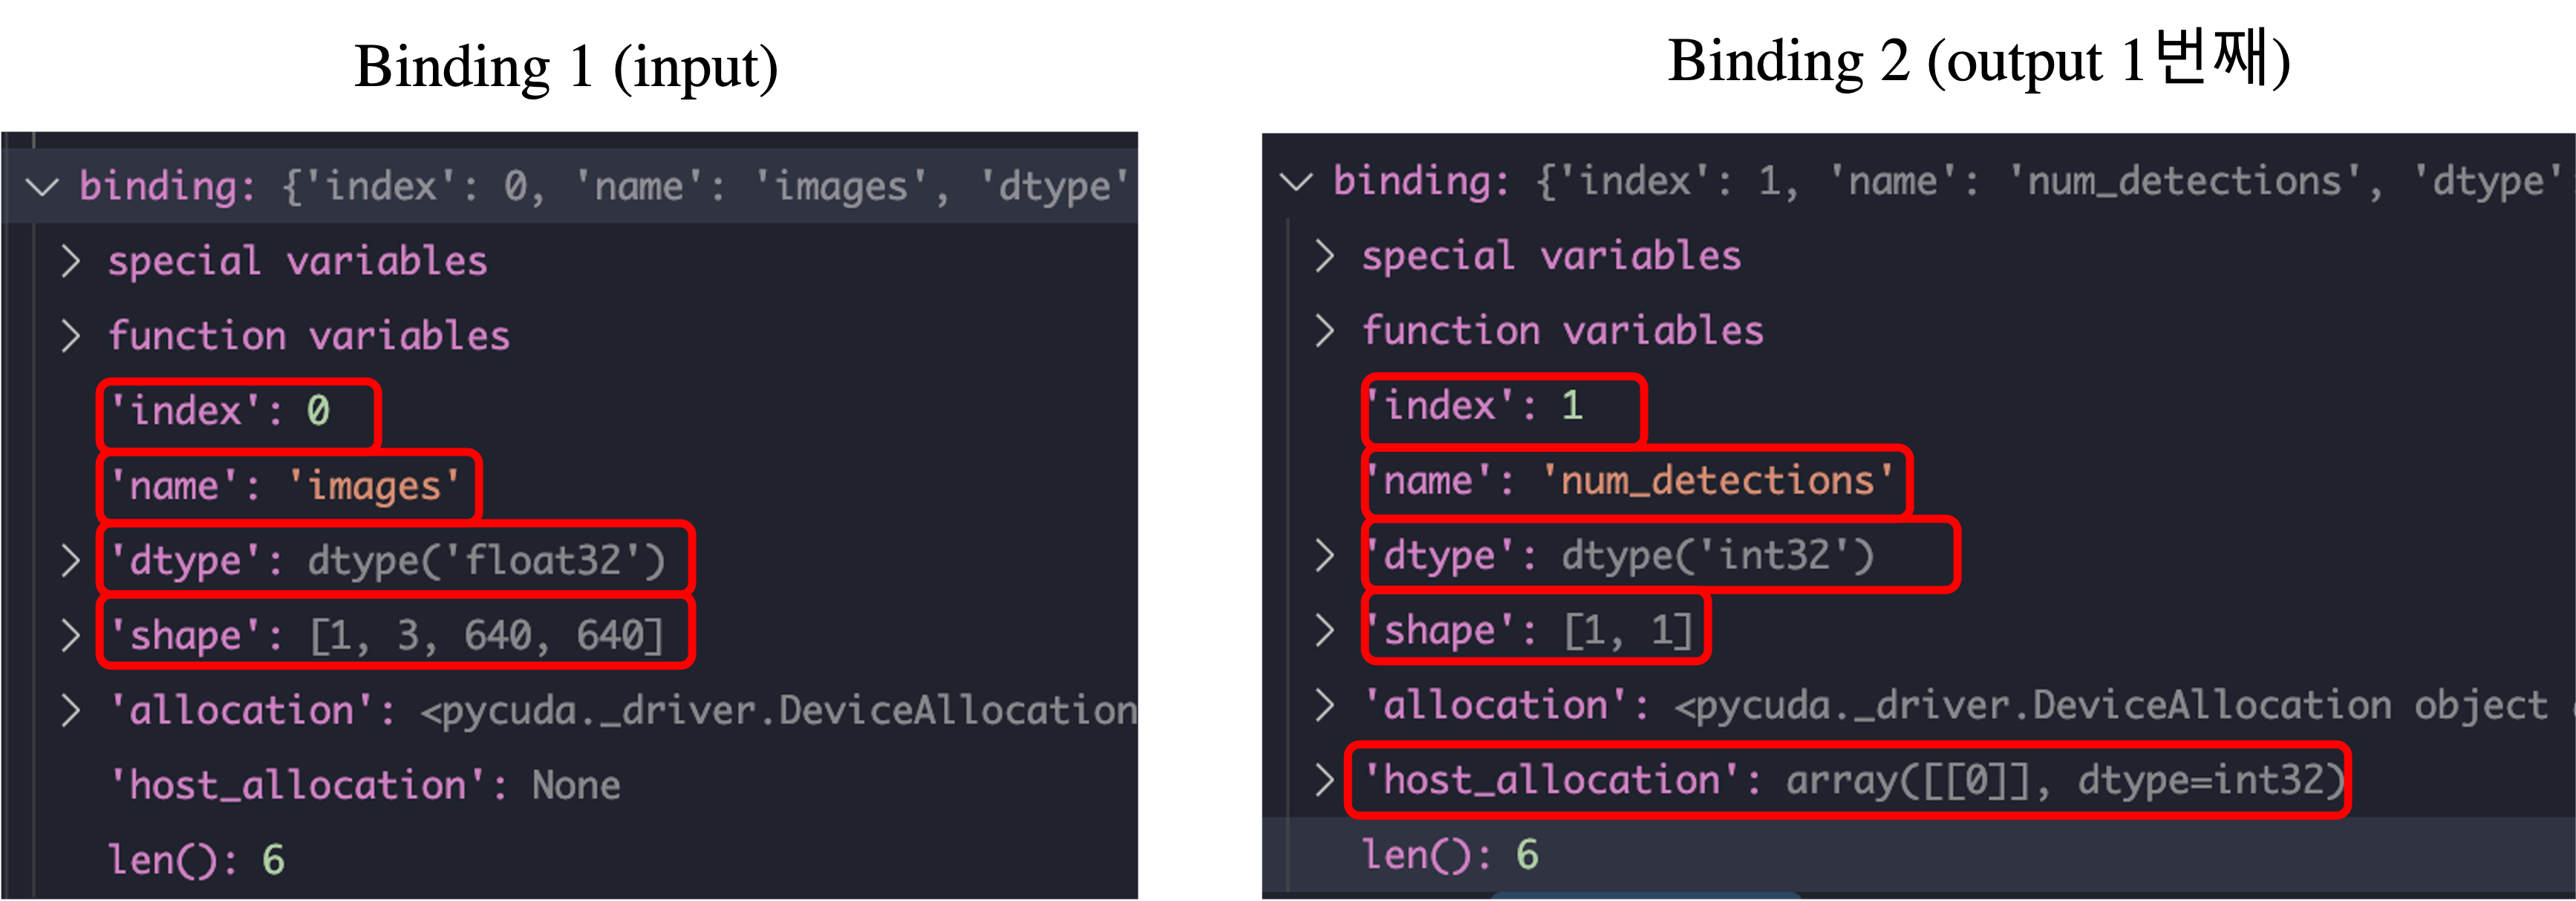
아래 사진은 1번째, 2번째 index를 가진 binding에 대한 정보를 출력한 것입니다. 1번째는 input에 해당하는 binding이며 2번째는 num_detections에 대한 output에 해당하는 binding입니다. Num_detections에 대한 binding은 host_allocation을 가진다는 것을 알 수 있습니다.

1.3 Inference TRT model
Setup완료하였으니 이제 inference해보죠.
    def inference(self, input_image):
        image = input_image.transpose(0, 3, 1, 2) # NHWC to NWHC
        image = np.ascontiguousarray(image)
        cuda.memcpy_htod(self.inputs[0]['allocation'], image) # input image array(host)를 GPU(device)로 보내주는 작업
        self.context.execute_v2(self.allocations) #inference 실행!
        for o in range(len(self.outputs)):
            cuda.memcpy_dtoh(self.outputs[o]['host_allocation'], self.outputs[o]['allocation']) # GPU에서 작업한 값을 host로 보냄

        num_detections = self.outputs[0]['host_allocation'] # detection된 object개수
        nmsed_boxes = self.outputs[1]['host_allocation'] # detection된 object coordinate
        nmsed_scores = self.outputs[2]['host_allocation'] # detection된 object confidence
        nmsed_classes = self.outputs[3]['host_allocation'] # detection된 object class number
        result = [num_detections, nmsed_boxes, nmsed_scores, nmsed_classes]
        return result
cuda.memcpy_htod(self.inputs[0]['allocation'], image): input image array(host)를 GPU(device)를 copy하여 보냄- htod: h(host) to d(device)
self.context.execute_v2(self.allocations): 실제 Inference를 진행하는 함수cuda.memcpy_dtoh(self.outputs[o]['host_allocation'], self.outputs[o]['allocation']): GPU device에서 진행한 inference값을 host로 copy하여 보냄self.outputs[i]['host_allocation']: i번째 output의 값이 저장되어 있는 변수
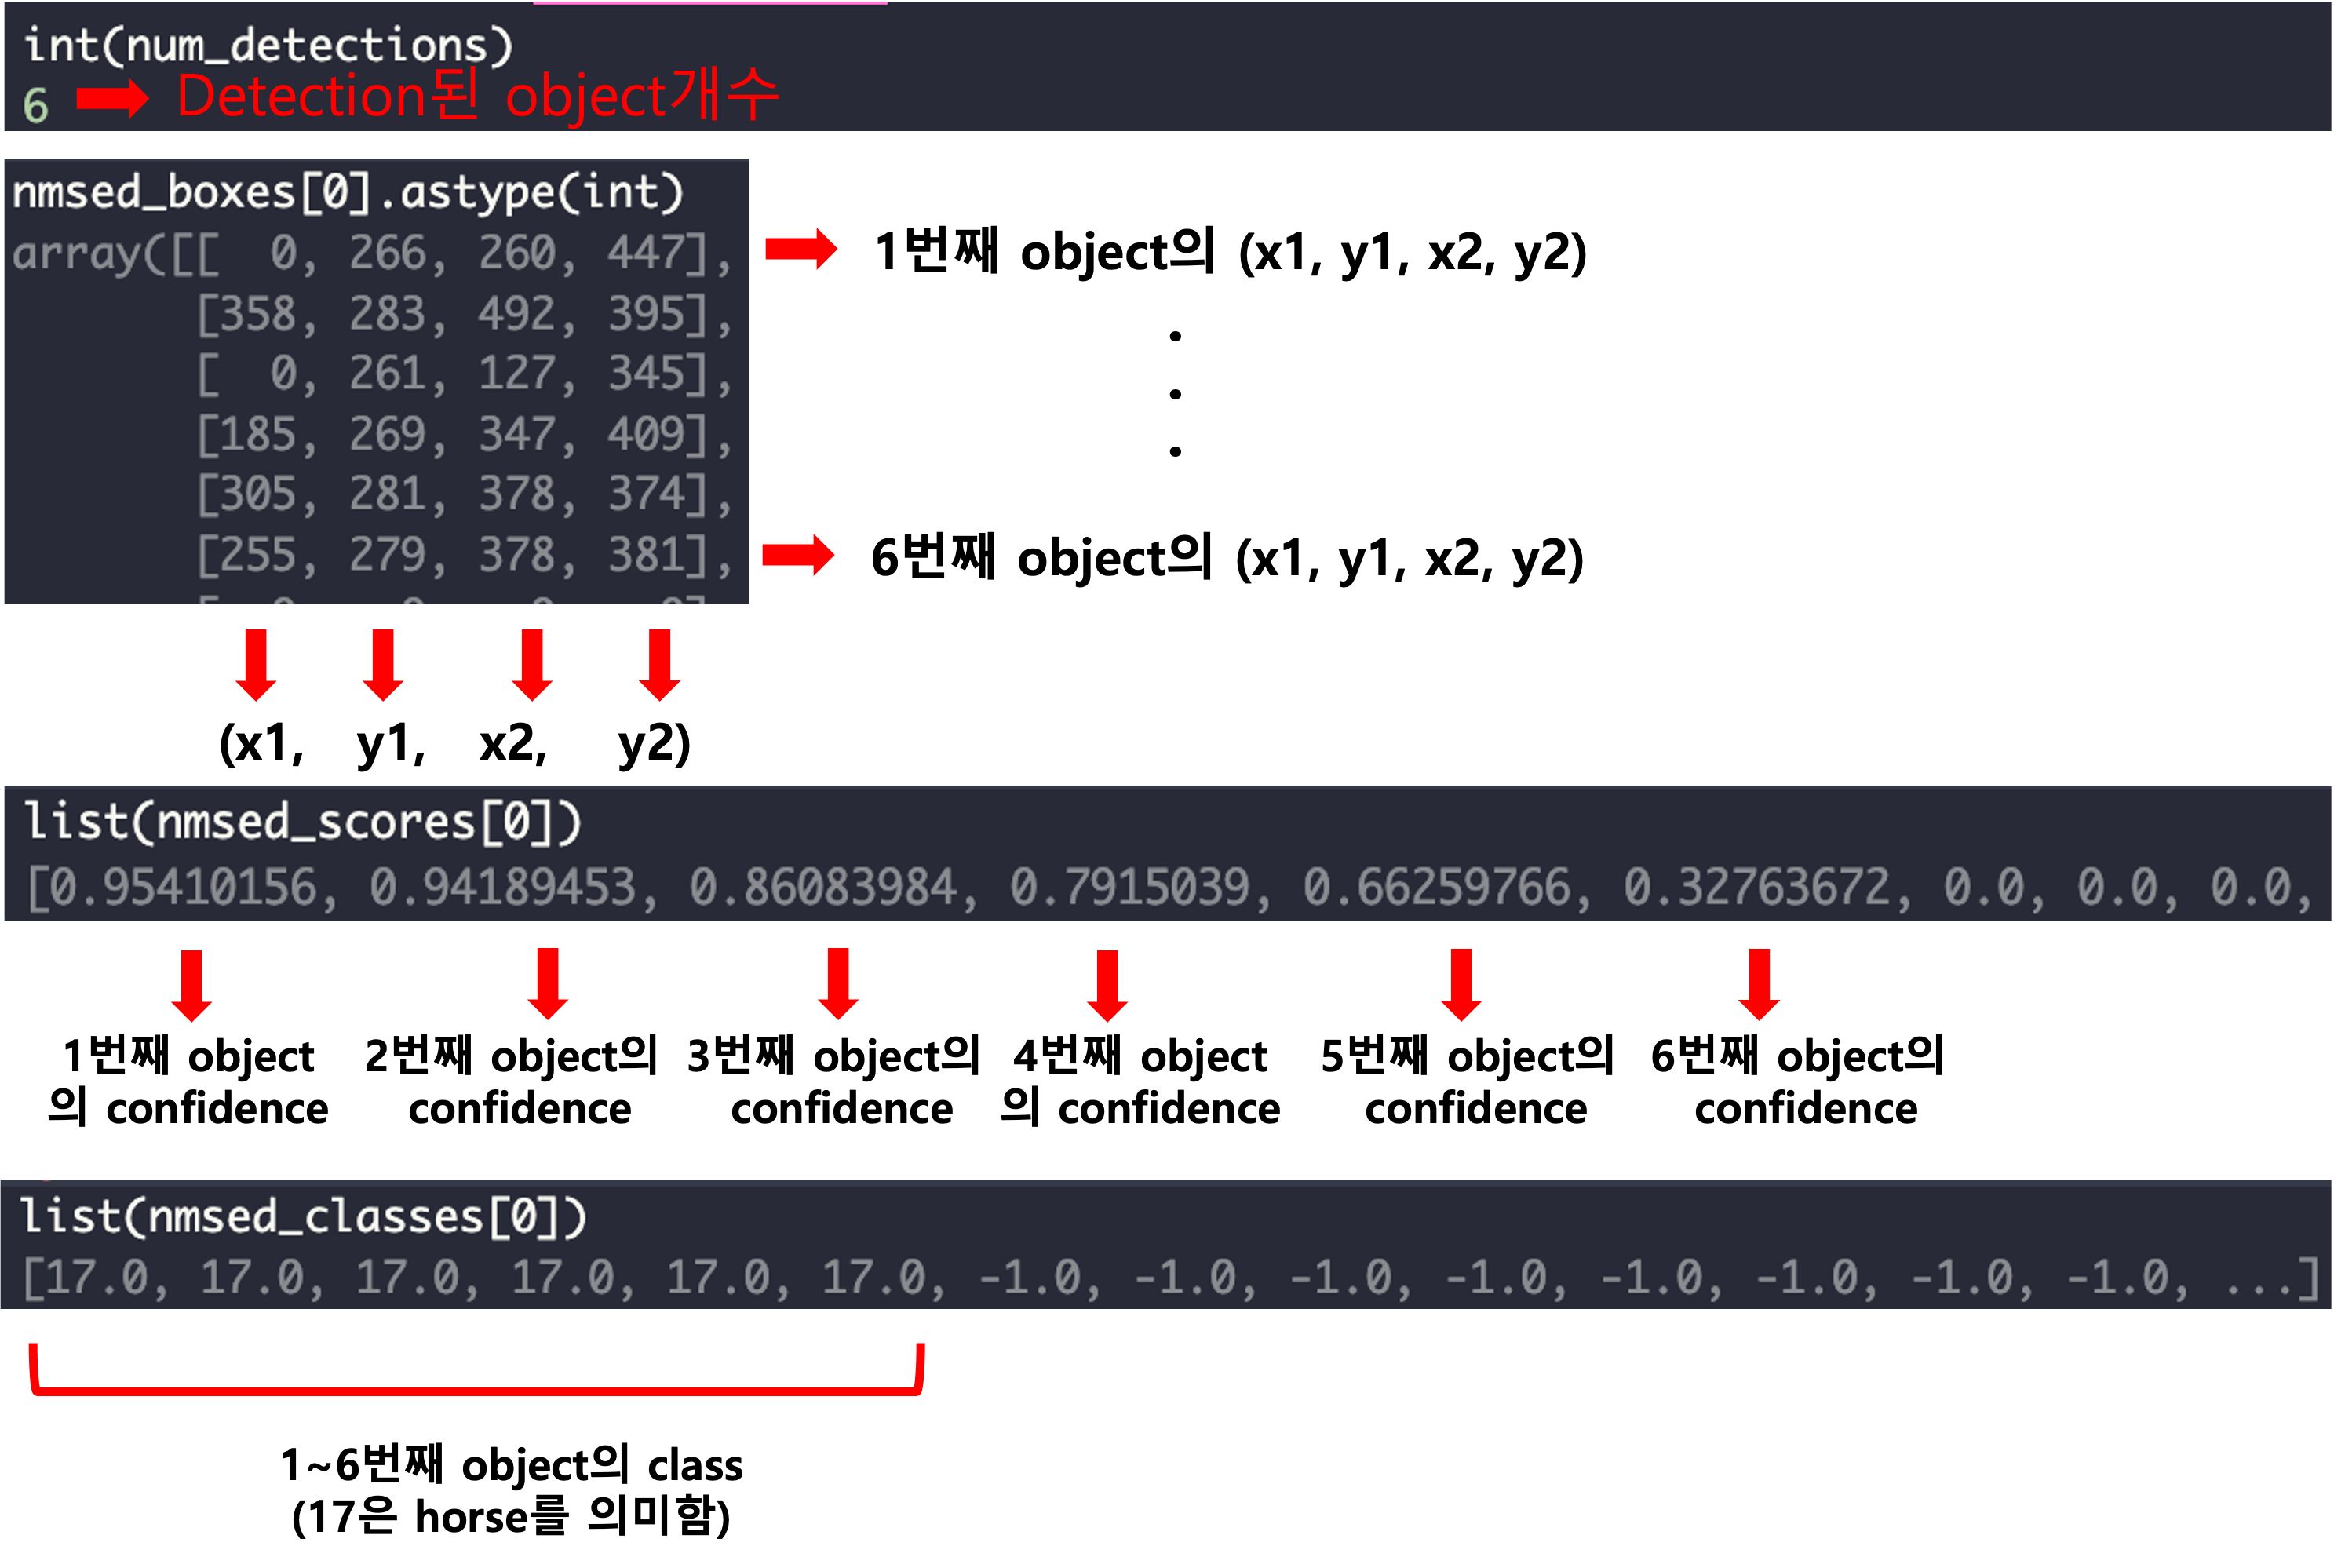
yolov7 model의 output인 num_detections, nmsed_boxes, nmsed_scores, nmsed_classes에 대한 값과 그에 대한 설명은 다음과 같습니다.

1.4 detection 결과 및 inference 속도
horse.jpg에 대한 detection 결과는 아래와 같습니다.

그리고 V100으로 측정한 yolov7 모델의 inference 속도는 7.552ms입니다. 20번의 warm-up하고 iteration 200번에 대해 평균을 낸 속도입니다. 또한 Host2Device와 Device2Host에 대한 Memory copy가 포함된 inference time입니다.

'AI Engineering > NVIDIA' 카테고리의 다른 글
| [NVIDIA] DALI multi-GPU 사용법 with PyTorch (2) | 2023.06.22 |
|---|---|
| [NVIDIA] DALI 사용법 with PyTorch (4) | 2023.06.18 |
| [NVIDIA] TensorRT plugin 사용 및 예제 (feat. yolov7) (6) | 2022.07.25 |
| [NVIDIA] DeepStream 이해 및 설명 (0) | 2022.07.13 |
